Telescope in Minecraft
This article is about how to make a telescope in Minecraft. A telescope can be used to see faraway objects. And now you will learn how to build it!
Making a telescope in Minecraft is a fun and creative way to explore the game’s vast universe. To make a telescope, you will need to gather some materials, including one copper ingot and two crystal pieces. Copper ingots can be obtained by mining copper ore or smelting copper blocks, while crystals can be found in geodes or by mining amethyst blocks. Once you have the necessary materials, combine them on a crafting table to create the telescope.
Hold the telescope in your hand and right-click to zoom in on objects in the distance, such as the moon or stars. The telescope also works at night, making it easier to see celestial objects in the sky. With a telescope in Minecraft, you can explore the game’s universe and marvel at the wonders of the night sky, making your Minecraft experience even more immersive and enjoyable.
Materials needed
- 2 Glass panes, these are crafted with sand and glass, but I’ll save your time by telling you that they are located under the “Glass” category’ at the crafting table.
- 1 Sticky Pistons is also located under the “Gadgets & Devices” category at the crafting table.
- 1 Fishing rod- this is made by surrounding a stick with string, which is found among “Miscellaneous” items on the crafting table.
- 2 Cobblestones- this material is gathered by breaking cobblestone, which you can mine under the “Building Materials” category at the crafting table.
NOTE: These materials are all crafted in a 2×2 or 3×3 grid, so they only need one slot on your inventory!
Steps about how to make a telescope in Minecraft?
Step 1: Now, gather all of your materials and then find a place you’d like to put the telescope. It can be anywhere at all!
Step 2: Place the dirt or grass block on the ground where you want to build your telescope. You might want to make it big enough so that there will be room for more than one level below ground.
Step 3: Go back up to the surface and hold down shift+right-click with your piston in hand, but don’t release shift just yet! Change means that you’re holding down the button, while right-click implies that you’re clicking it once. Once both switches are held down together, they’ll stay that way until you click something else (like left-clicking your mouse, which you don’t want to do).
Step 4: Click your piston one time without releasing shift. You can tell if this worked because the piston will be sticking up from the block you placed on the ground in Step 1. If it isn’t, make sure that you’re holding down shift and right-clicking the piston. The piston will only work while both buttons are held down together!
Step 5: Once a black box appears from the top of the piston, right-click your glass pane once inside of that black box. There should now be a glass pane hovering over where you spawned the sticky pistons earlier if done correctly. This isn’t the only way to do it, but this is my favorite and easiest way.
Step 6: Right-click your sticky pistons again without letting go of shift and build another block on top of the glass pane that you just placed there. That’s right, and we’re going to put another box on top of it! The new container must be filled in entirely with blocks, so no spaces are left for now. You’ll need those spaces later!
Step 7: Without letting go of shift+right-clicking again, replace the original dirt/grass block that you used as a base under your telescope with another one. Then repeat Step 5 by placing another glass pane inside the black box from the sticky piston afterward.
Step 8: Keep repeating Steps 6 & 7 until you reach the top. There should be a layer of glass panes and a layer of blocks on either side surrounding the middle black box that we created earlier.
Step 9: Once this is done, you can remove all of your sticky pistons! They’re done now, and we don’t need them anymore. But what about those holes in the glass?
Step 10: Using your fishing rod (the stick + string combo), try to ‘fish’ through any one of the gaps between two glass panes. If done correctly, you’ll see an animation where you move up in front of what looks like empty air, and the fishing bar appears above your hand. When you see this, it means that a block has been broken and caught on the end of your fishing rod!
Step 11: After a short animation, the ‘caught’ block will appear to fall onto another part of your telescope’s platform. You can do this as many times as you’d like until all the gaps are filled in again with blocks!
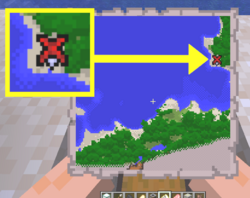
Step 12: Finally, try out your new telescope by right-clicking it from the inside. This is what you should see if everything was done correctly! If not, don’t be afraid to take things apart and start from scratch again. Don’t rush through something because once you make a mistake, there’s no going back! Remember, patience is key!
Now that you’ve learned how to build a telescope in Minecraft, you can go out and start exploring, whether it be by land or by sea. Just make sure that when you look through the telescope, remember to use your peripheral vision, too, because you never know what might pop up right next to you! After all, life is full of surprises!
Importance of telescope in Minecraft
Read more: A Detailed Overview About How To Put A Saddle On Horse In Minecraft?
The importance of a telescope in Minecraft is that you can see far away and make your world much more significant. Now when you build a house, it’s built over days instead of hours! Before the telescope update, there was only one way to make this happen without cheating or using mods: build up. You started with a dirt hut (guarded by monsters such as zombies, skeletons, spiders, etc.).
After you had enough resources, you would add another layer of dirt blocks on top until it became something closer to your final product. It was time-consuming and tedious but effective in helping you maximize your creative potential. Without the help (and ultimate boredom) that comes from adding layers upon layers upon layers of dirt blocks, you would most likely never be able to reach the 100th floor of your eventual skyscraper.
Apart from this if you are interested to know more about How To Use A Cartography Table In Minecraft? then visit our Gaming category.