Many players can get bored of the same old things in Minecraft, even though it has an infinite amount of possibilities. Some people go for mods, while others tend to do almost anything else. We’ll see how useful or pointless it is to make a treasure map and find buried treasure in Minecraft!
Steps to find buried treasure in Minecraft
Step 1: Don’t Make One Out Of Every Single Type Of Block
Before you start your journey, keep this in mind: if you want to find some buried chests, don’t make one out of every single type of block available in the game. Of course, there are no limits when you’re playing on Creative mode, but that’s not what we’re doing here.
Most people dig up the ground looking for something valuable without realizing that they made their map using diamond blocks. If you were lucky enough, sometimes Endermen will teleport your map somewhere else in the world, causing you to run around like a headless chicken. If you don’t want this to happen, use any other type of block than diamond.
Step 2: Use of Treasure Map
A treasure map can be used to find (surprise!) buried treasure. By that, I mean anything from simple chests with diamonds and emeralds to mob spawners and dungeons, or even another buried treasure map leading you somewhere else! For example, if we wanted to make our own personal pyramid, we could start by digging a big hole (be sure to mark its entrance). We’ll need this one later on, so don’t forget! Remember that once there are at least ten blocks of sand or gravel below you, there’s a chance for mobs to spawn, and we don’t want that anywhere near our pyramid!
Step 3: Pro Tip
As we said before, we’re not going to use diamonds for this. This might be your first treasure map, but I’m sure you already know what block represents an “X.” If it isn’t wood, then there’s always stone, sand, or dirt. It doesn’t matter as long as the material is different from the one used to mark the final location of your chest. Once your map is complete, head towards the nearest stronghold and start killing monsters.
You probably noticed something strange about them: they drop loads of experience orbs when defeated! Thanks to this trick, you’ll have enough points in no time, so don’t hesitate to fight the wither if you feel like it. The good thing about experience is that you can use it to enchant anything in your inventory, including maps, which means less time will be spent grinding for levels! Before doing this, remember to bring some paper. Otherwise, there’s no way for it to appear on your map.
Read More: CARPAL TUNNEL MOUSE: All You Need to Know About Carpal Tunnel Mouse
Step 4: Enchanting Map, Using An Enchantment Table:
Once you have enough experience stored up, head back to the pyramid and start enchanting your map using an enchantment table. I recommend using Fortune since chests are more likely to contain better loot, but Silk Touch is also a good choice if you want flint instead of glowstone. Your map should now look different from before, so use it on yourself or toss it into any body of water so everyone else can benefit from your hard work.
Step5: Its Time To Find Out Chests
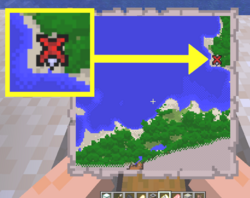
Once you have a treasure map in your inventory, it’s time to go out and find some chests! Since we didn’t mark the pyramid on our map (and for this tutorial’s sake, let’s pretend that we don’t know where it is), there isn’t any way to lead us back home if something goes wrong (such as dying). If we wanted to ensure we could always find a way back here, we would need to mark the room adjacent to the entrance instead. For example: digging down until we hit the water and then marking somewhere close, or near some trees if they happen to be there too. Remember, though, that nothing stops us from teleporting away from our base, so just placing an X won’t guarantee a safe arrival.
Step6: Find a Stronghold
Finding a chest is easy: once you’re inside a stronghold, start looking around for any chest or dungeon spawner. If you see one close by, then dig straight down and head towards the entrance. Remember that they’re usually surrounded by water, so it’s best if we avoid going underwater.
Step7: Follow The Stair Leading To Bedrock
It would be best if you came across some stairs leading to bedrock as soon as you go far enough. It doesn’t really matter if they lead downwards or upwards, but the loot is often found deep under the earth. Or at least very high up in its sky! No matter how your path looks from now on, keep heading downwards until you find a room with at least two chests in it. We need both halves of our map in order to complete it and gain access to a chest.
Step 8: Merge Both Maps
Once you have both parts in your inventory, place them in the 2×2 grid in the middle of the crafting table. Since we placed items on each corner when enchanting them, they should merge automatically! If not, simply put one map on top of the other and wait for it to merge. You should now see a completely new image appear before your very eyes: this is our treasure map’s “compass” showing us where exactly our loot can be found! From now on, there are two ways to go about finding chests based on which direction you’re facing relative to our target location.
a) If you’re looking towards “up,” then dig straight down until you hit bedrock, then head out towards “left” (or “right”) and keep digging straight down. Once you hit the water, turn around and go back up. This is the safest way to avoid falling into lava or other hazardous liquids.
b) If you’re looking towards “down,” then dig straight down until you hit bedrock, then run out towards “right” (or “left”) while avoiding any holes in the ground! Once you reach the end of your path, head back up and repeat this process until you find a chest or reach your destination.
Important Note:

As I said before, there are two ways to do this, but they both lead to roughly the exact location: one of four possible rooms close to our target room. You must keep in mind which direction you’re heading when digging so you know which room you’ll be entering. If it’s on the opposite side of where you’re looking, refrain from digging straight down, or else you might end up finding yourself right next to some lava (or worse).
If you find any zombie spawners during your search, then don’t get too close to them! We only need the chests, and the glory of placing our feet inside them rewards enough for us this time around. Once we’ve collected all of our loot, it’s time to head back home and cash out our prize! Ever wanted to experience what true bliss was in Minecraft? By building a gaming PC, you’ll be able to amp your visuals up to the extreme while also enjoying ray-tracing and shader packs that’ll change the way your game looks.
FAQs
- After you find a stronghold, how do you dig out the rooms?
Certainly not. The only way to get into a stronghold is by finding the end portal room and going through that—it’s always under a 5×5 stone platform with torches on each of the four upper corners. And no mobs will spawn in these rooms, so you can stand safely on top of it while digging downwards from there. Once you’ve dug down another 7 or 8 layers from this room, then yes, zombies can spawn in your stronghold from time to time—but the point is to have your shelter dug out by then.
- How do you make a shelter when it’s raining?
You can’t, you’ll need to wait for the rain to stop.Once you find your way in (usually by finding a moat around the stronghold and following that), it’s easy to do. Just dig out the rooms, making sure to light everything well (and not forgetting any corners).